

The text and information on this site can be seen as a complement to the Audio Mostly 2023 workshop. During the workshop we will discuss in detail, code together, come up with new ideas, test different waveforms, filters, envelopes and so on.
SuperCollider is a free and open-source environment for real-time audio synthesis coding, available for a wide variety of platforms (Windows, Linux, MacOS, and so on). It is very versatile and powerful, even if it has quite a steep learning curve.
SuperCollider consists of two sides, a server and a client side. Synth definitions are written and then uploaded to the server. These synth definitions are then called from the client side, being manipulated or changed in various ways.
For SuperCollider to work, the server needs to be started. This is done by writing the following code: s.boot;. This code is executed by marking this line of code by clicking with the mouse-cursor anywhere in the line, and then pressing <Shift> and <Enter> simultaneously. It is also possible to start the server by selecting "Server" in the menu bar, and then "Boot Server".
The server is stopped by executing the following line of code: s.quit;, or by selecting "Server" and "Quit Server" or "Kill All Servers".
For this workshop, it could also be fun to start the oscilloscope that shows the audio output of the server, by executing the following line: s.scope;.
Writing multiple lines of code within parenthesis, all this code can be executed by <Cmd> (in MacOS) or <Ctrl> (in Windows) and <Enter> simultaneously.
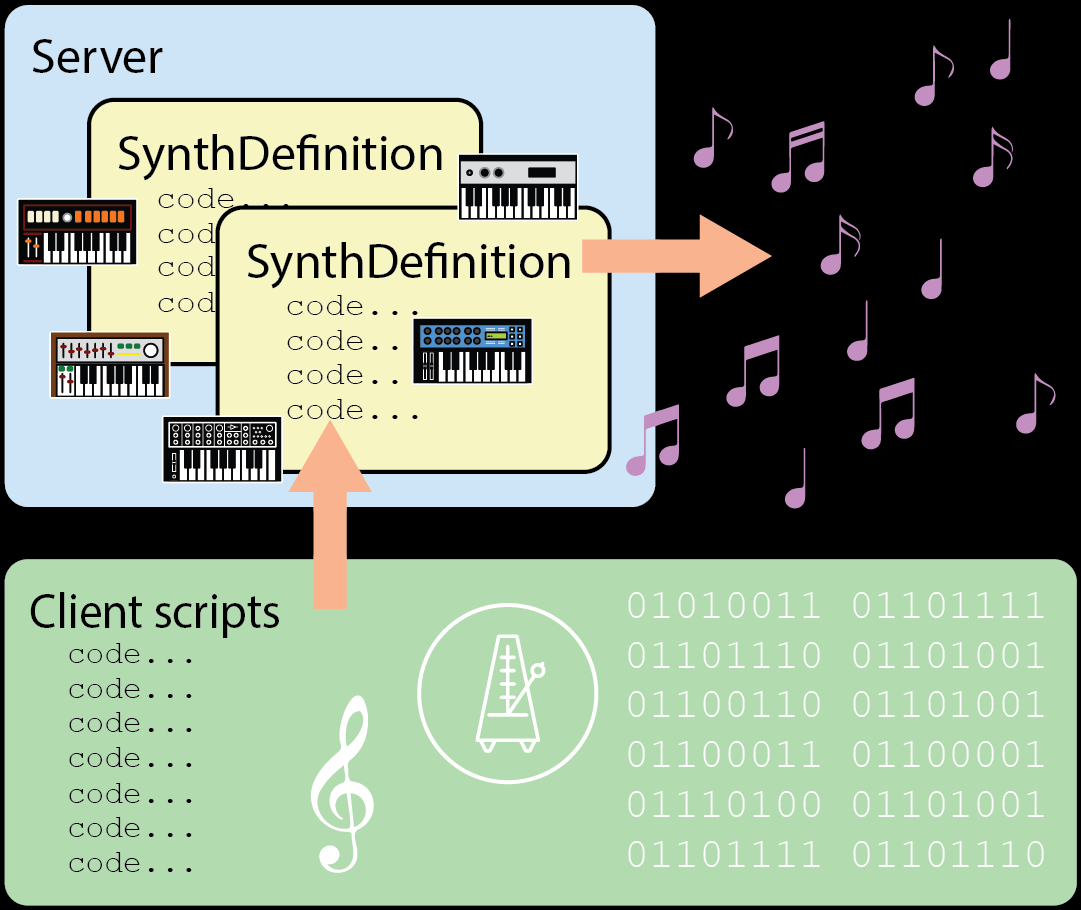
A synth definition is a snippet of code that defines a synth. This definition can consist of one or many oscillators for creating tones, or filters for harmonics, or envelope generators for shaping the amplitude of the sound.
The synth definition is always initiated by SynthDef( followed by the name of the synth definition written either as \name or "name". The name should be followed by a comma , and then the code for the synth definition follows within curly brackets { code }, then the synth definition is closed by end parenthesis and semicolon );. However, SuperCollider also needs to know what to do with the synth definition, either adding it to the server or adding and playing the synth definition. For these first steps it is best to add and play by ending the synth definition with )}.play;.
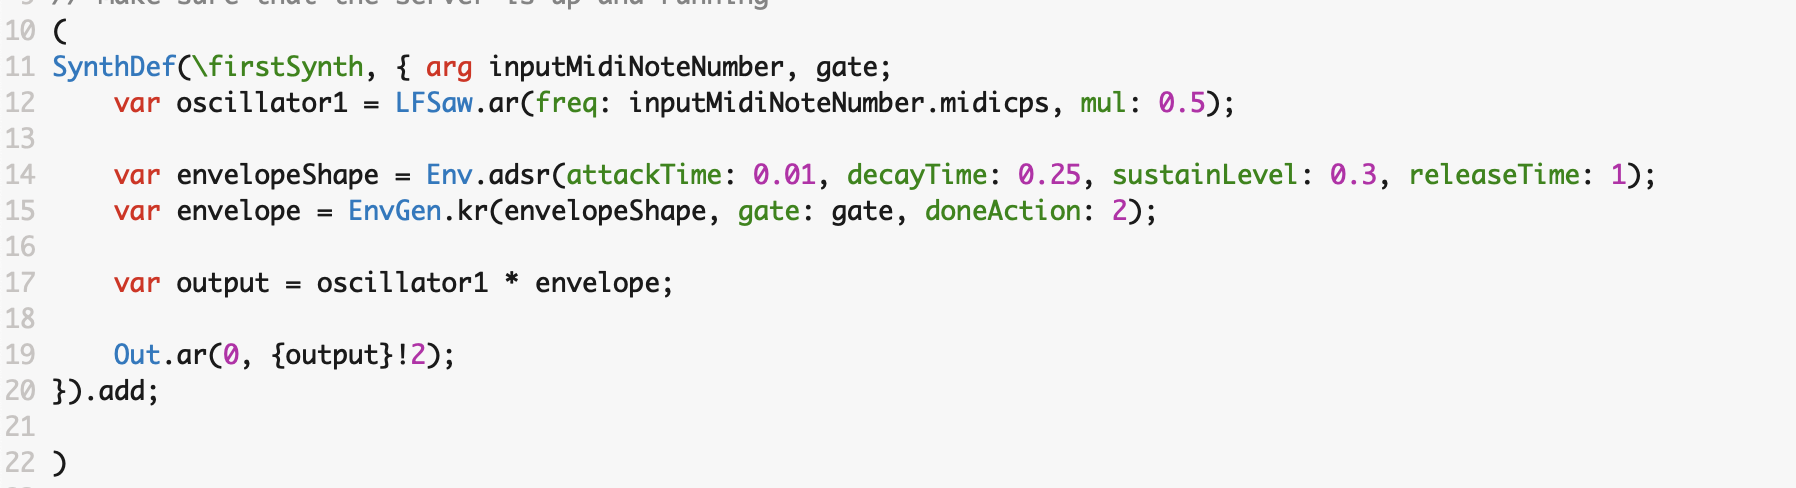
In the code snippet to the right, a synth definition is created called firstSynth. This synth definition has one variable called oscillator1. A variable is a container where the computer code can store information, or values, or anything. The variable stores in this example a Sawtooth waveform. A variable can be named anything (but should normally not start with a number).
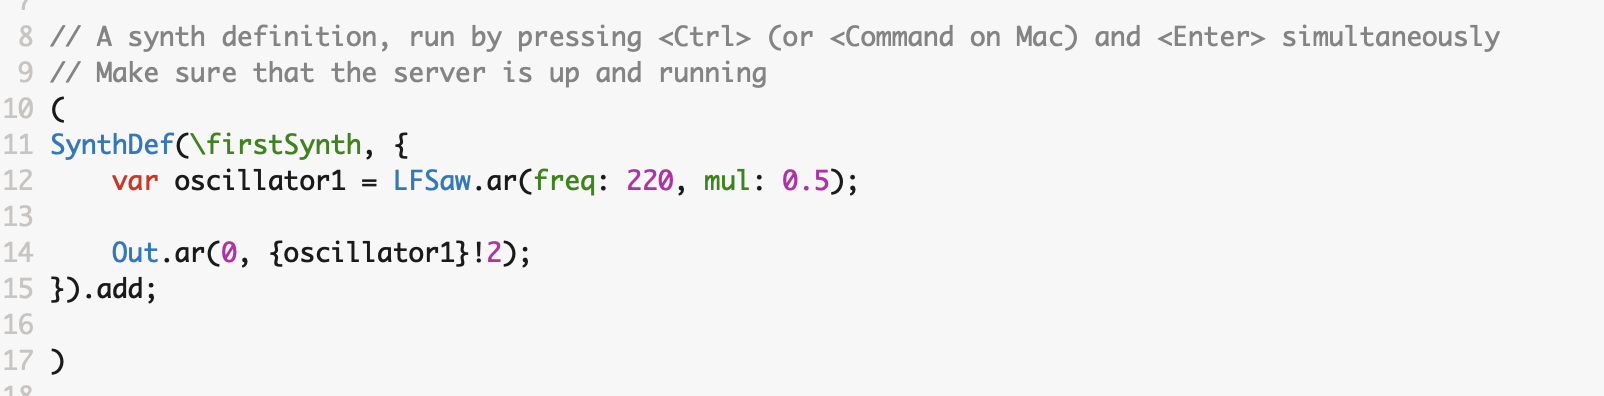
LFSaw creates a sawtooth oscillator. A sawtooth oscillator is a good starting point for subtractive synthesis as it contains a lot of harmonics that can be filtered to create the desired sound, as compared to a sinusoid. This is followed by .ar which tells SuperCollider that this oscillator should use audio rate and create waveforms in the audible frequencies. There are two input arguments for the sawtooth oscillator in this example, the first, freq: (which is must be inserted) is the frequency of the tone (220Hz in this example), the second mul: provides a value for the sound level of the output of the oscillator. Typically, a sound oscillates between -1 and 1, and anything louder than this will create distortion/clipping at the audio output. In this example, the output is attenuated to be between -0.5 and 0.5.
The oscillator is followed by declaring an output. This is done by Out.ar, where again .ar tells SuperCollider to use audio rate. This is followed by sending the variable oscillator1 to the output. The curly brackets and the explanation mark and the number 2, create a stereo output with the same sound in the left and the right audio channel.
On the client side, code can be written that will be send various information to the synth instances currently available on the server. First, change .play at the end of the synth definition to .add. This will add the synth to the server but without playing it. Second, a new parenthesis outside the parenthesis used for the synth definitions to allow easy execution of the client scripts. To be able to access the synth instances on the server, these need to be registered. This is done by registering the synth instance in a variable var myFirstSynth = Synth.new(\firstSynth).register; where myFirstSynth is the variable name, and Synth.new creates the new synth instance of the synth with the name firstSynth.
In SuperCollider variables must be declared first in the code, or in individual functions.
Then, by using the variable name myFirstSynth followed by .set it is possible to send information to the synth on the server. In the synth definition, in the beginning after the curly bracket, it is possible to specify input arguments. These arguments are variable names used to receive information sent to the synth definitions, for example something like this: SynthDef(\firstSynth, { arg inputMidiNoteNumber; where inputMidiNoteNumber is used to hold the incoming information. On the client side, data is then sent like: myFirstSynth.set(\inputMidiNoteNumber, 60); and the value 60 will be sent to the synth definition and stored in the variable inputData.
MIDI note number 60, is the middle C or 261.63Hz, see more about MIDI note numbers here: MIDI note numbers. In the synth definition the code has been updated to not only receive the MIDI note number, but also to use this MIDI note number and .midicps to convert the MIDI note to frequency in Hertz for the oscillator.

There are various software keyboards that can be used during the workshop if no hardware keyboard is available:
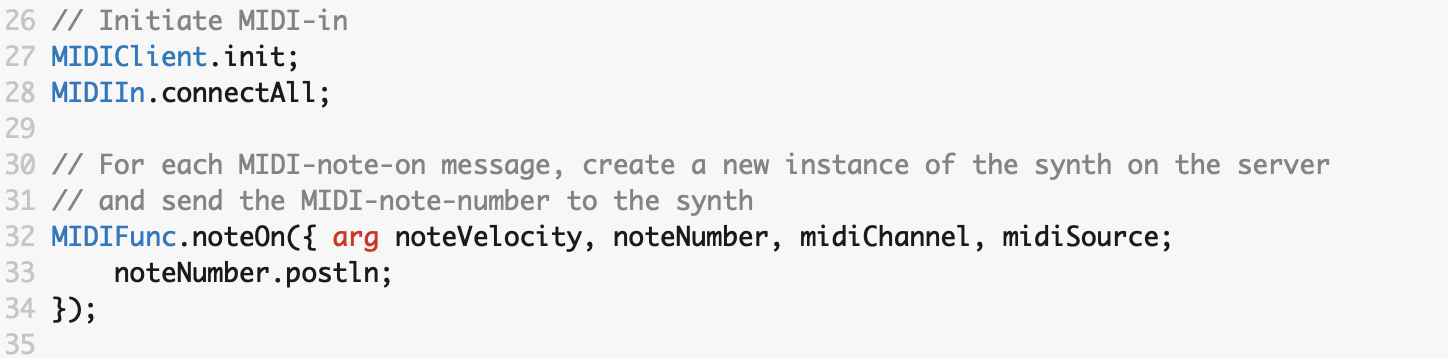
It is possible to receive and send MIDI information in SuperCollider, but first the MIDI input device needs to be initiated. This is done with two lines of code in client side. First initiate the MIDI client MIDIClient.init; and second connect to all MIDI in devices with MIDIIn.connectAll;. By using MIDIFunc, a function to recieve MIDI information, followed by what type of incoming MIDI information that should be received, e.g. .noteOn, it is possible to send MIDI to the synth definitions on the server.
For a noteOn message there are a number of input arguments, arg noteVelocity, noteNumber, midiChannel, midiSource;, that specify the velocity (i.e. the sound level) of the MIDI note number, in which MIDI channel from what MIDI source. Other types of MIDI messages are noteOff for when the key is released, bend for the pitch bend, and cc for control messages.
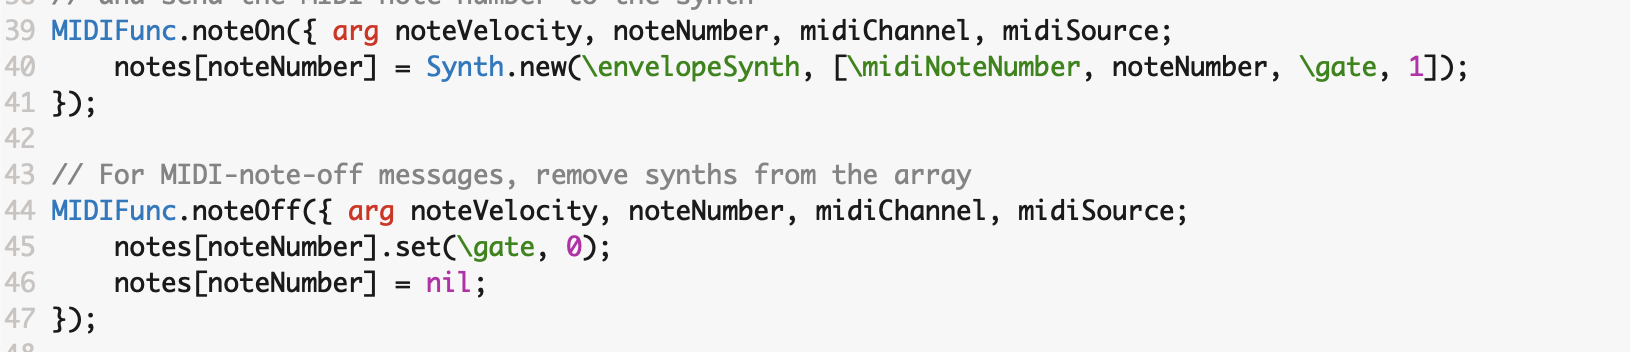
One good way of working with MIDI in SuperCollider is to create an array with 128 positions/indexes, Array.newClear(128);. When a key on the MIDI keyboard is pressed (noteOn), a new synth instance is created and stored in the array on the note number position. When a key is resealed (noteOff), the synth instance is deleted from the array by setting the position to nil. This means that the synth will have full polyphony.
However, the synth definition needs to be updated as well. For the sound from the synth to be started when a key is pressed and then stopped once the key is released a envelope generator needs to be added. The envelope generator has a fast attack time (when the sound goes from quiet to full sound level), a quite fast decay time (the time it takes to from full sound level to the sustain level), an attenuated sustain level (the sound level that is kept while the key is pressed), and a longer release time (the time it takes for the sound to be silent when the key is released). The envelope generator is triggered when the gate signal goes from low (0) to high (1). The synth definition should also have a doneAction: 2 argument in the envelope, which means that the synth instance will be deleted from the server once the envelope is done. This is as it should be as a new synth definition is always created for each key press.
There is more or less no end to the possibilities for writing the synth definition, or for writing client scripts and sending information to the synth, but that is something that will be further explored during the workshop.
Any number in the synth definition can be changed and adapted by input arguments. The values for these can come from data for sonification, or MIDI control messages (MIDI 1.0 Control Change Messages), or send via OSC or even serial protocol from various sensors.
Subtractive synthesis is when sound of, the timbre of, a complex sound is altered to shape the sound in a desired way. Often the harmonic components of the sound are attenuated by a filter.
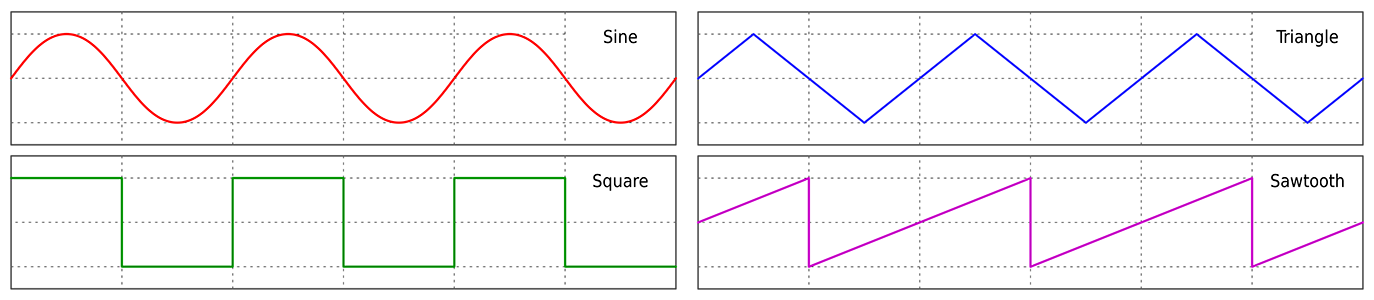
The most basic waveform is the sine wave. The sine wave might not be the ideal starting point for subtractive synthesis is it does not contain any harmonics, only the fundamental frequency. However, the sine wave can be useful in a sound design never the less. A sine wave is written in SuperCollider as SinOsc.ar(freq: 220);. The next type of wave form to use is the triangle wave. This wave contains odd harmonics with a quite fast roll off, making it sound more bright compared to the sine wave. The traingle wave is coded as LFTri.ar(freq: 220);. Next is the square wave (or pulse wave), which also contains odd harmonics but with less attenuation making it sound brighter compared to the traingle wave. The square wave is coded as LFPulse.ar(freq: 220, width: 0.5);. The width of the square wave is set by width: between 0 and 1. The pulse width changes the frequency content of the sound. Finally, the sawtooth wave that contains both odd and even harmonics, making this sound contain most high frequency content of the four wave forms. The sawtooth wave is coded as LFSaw.ar(freq: 220);.
In the example code a second oscillator is used, sounding one octave below the first (by dividing the frequency with 2). The two oscillators is then mixed together, by using +, and then the mix is dvidied by two (i.e., the sound level is halfed) to avoid possible distorsion of the sound.
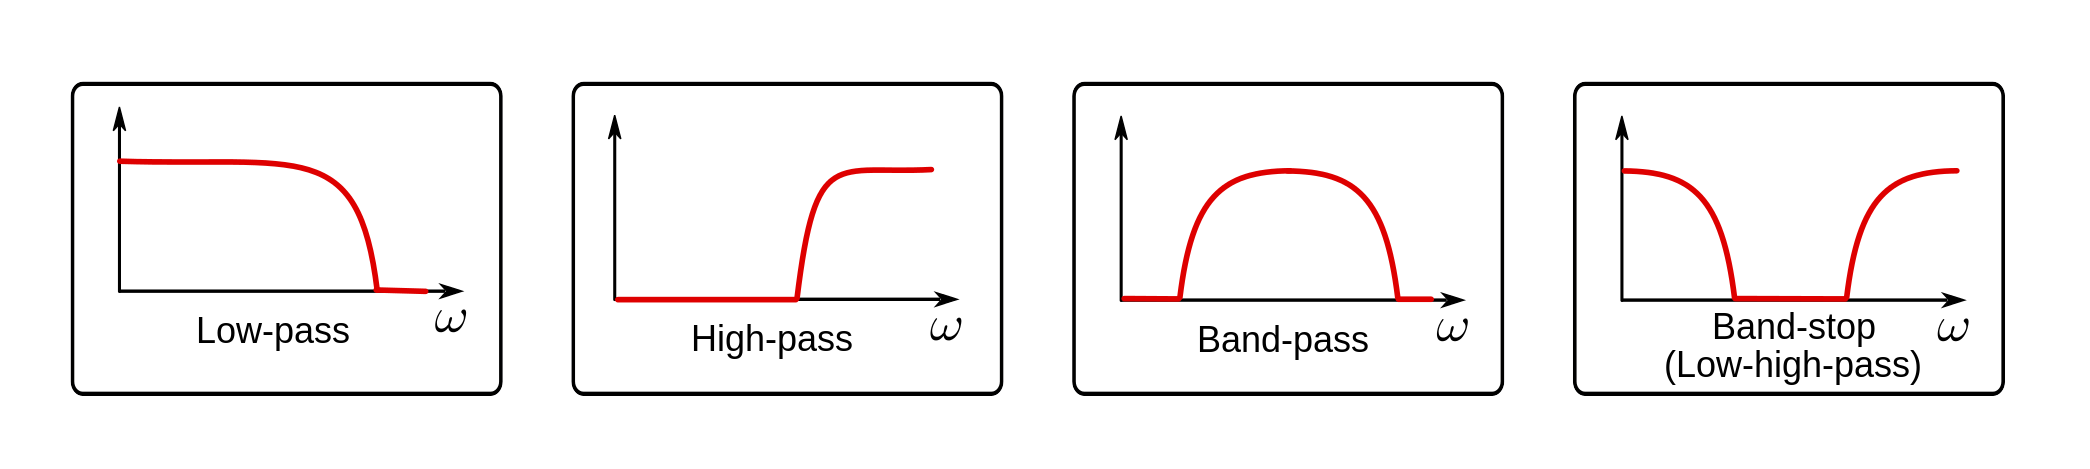
There are different types of filters to use for the sound design. The idea is to select the filter that removes, or at least attenuates, the unwanted frequency content from the basic waveform. A lowpass filter attenuates high frequencies, and lets low frequencies pass through the filter. A cutoff frequency is specified where the filter will start to attenuate the sound. In SuperCollider a simple lowpass filter is coded as LPF.ar(in: mixedOscillators, freq: 2500);. In this example the cutoff frequency is set to 2500Hz. Please avoid using a cutoff frequency of 0Hz, as this might result in very loud sounds.
A highpass filter is attenuating low frequencies, and is coded as HPF.ar(in: mixedOscillators, freq: 2500);. Both the lowpass filter, and the highpass filter can have resonance. The resonance is an internal feedback loop in the filter, creating an emphasis of the frequency at the cutoff frequency. When the resonance is set to maximum the filter tends to self-oscillate at the cut off frequency. In SuperCollider the resonance is set between 0 (maximum resonance) and 1 (no resonance), and is coded like RLPF.ar(in: mixedOscillators, freq: 2500, rq: 0.5); and similar for the highpass filter (RHPF.ar). Please avoid using 0 for the resonance setting, as this might result in very loud sounds.
There are two more types of filter that can be of interest to explore, the bandpass filter which attenuates both low and high frequencies outside the cutoff frequency, and the band reject (or band stop) filter that attenuates frequencies around the cutoff frequency. These types of filters have the resonance setting, and can be coded as BPF.ar(in: mixedOscillators, freq: 1000, rq: 0.5); and BRF.ar respectively.
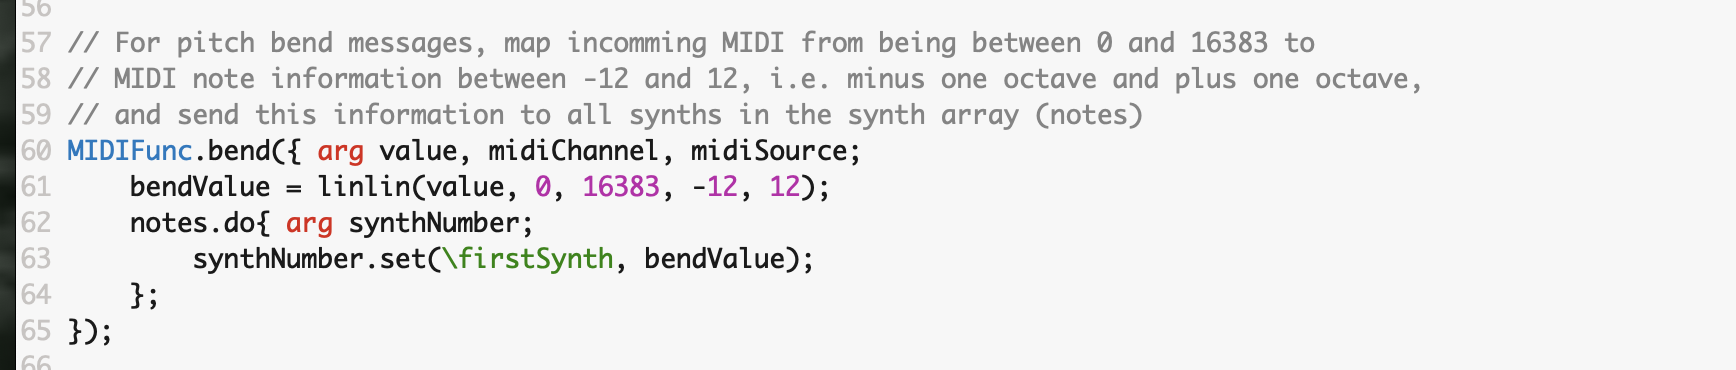
First is the pitch wheel. The pitch bend/pitch wheel message is received as .bend, and has three input arguments: arg value, midiChannel, midiSource;. The bend message has a higher resolution compared to most other MIDI messages and goes from 0 to 16383, compared to 0 to 127. These values need to be translated/transposed to reasonable values for pitch bending in SuperCollider. This can be done by mapping the message to new values, and in SuperCollider this can be achieved by using linlin which makes a linear to linear mapping of values. The linlin expects five arguments, first the variable containing the value that should be mapped, value in this case, the minimum value 0, the maximum value 16383, the outgoing minimum value, and the outgoing maximum value. These two final values need some consideration depending on the behaviour of the pitch wheel, e.g. -12 for minimum and 12 for maximum,which corresponds to one octave down and one octave up.
As the pitch wheel should affect all keys that are pressed, the array with the MIDI notes needs to be looped through and all synths should receive the pitch wheel value. One one of doing this is by notes.do which does something for each of the indexes in the array notes. This should be followed by an argument, arg synthNumber;, and then the synth at synthNumner should be set to the pitch wheel value. Of course, the synth definition must also have an input argument that receives this information.
In the synth definition, an input argument for the incoming pitch wheel value must be written, for example, pitchBend. By using .midiratio the pitchBend value is converted to corresponding frequency changes (in Hz) that can then be multiplied by the frequency of the oscillator.
The modulation wheel is most often used for vibrato, but can be used to control anything in the synth. The modulation wheel is like any other control message .cc in MIDI, and has the number 1. Different controls have different numbers, and some of these numbers are standard for various messages. A control message in MIDI usually comes with four arguments: arg value, controlMessage, midiChannel, midiSource;. In SuperCollider it is convenient to specify the number of the control message at the end of the MIDIFunc with },1); for control message number 1.
In the synth definition, the code needs to handle the incoming value. In this example var vibrato = SinOsc.ar(5).range(1 - (vibratoAmount / 127), 1 + (vibratoAmount / 127)).midiratio; the effect of the sinusoid oscillator (with a frequency of 5 Hz) adding vibrato to the main oscillator is varied by the incoming value. As no mapping was done on the client side, this was taken care of in the synth itself. By using range, the range (or amplitude) of the oscillator is changed. The larger the range, the greater the effect on the main oscillator. As the input argument, the variable name that stores the incoming value, can be from 0 to 127, the variable is divided by 127. Remember that when it comes to pitch, the MIDI note numbers ranges from 0 to 127 and compare this to a grand piano with (only) 88 tones. The vibrato should go from lower than the fundamental frequency to higher, therefore the value is subtracted from 1 (i.e. creating values lower than 1) and added with 1 (i.e. creating values greater than 1). The output from the sinus oscillator is then adapted to MIDI ratio, and multiplied with the frequency of the main oscillator.

Any MIDI message can be used, received and then sent to the synth. The value of these can either be mapped on the client side or transformed in the synth definition. There is more or less no end to the possibilities for writing the synth definition, or writing client scripts and sending information to the synth, or connecting control messages to different parameters in the synth. For example by adding various LFOs (Low Frequency Oscillator) that changes the cutoff frequency of the filter, or the amplitude of the sound. Using range(lowValue, highValue) is very useful for adjusting the sound.
Or you can use the note velocity from the MIDI signal and map this value (being from 0 to 127) to a value between 0 and 1 and use this as the levelScale value to make the synth responsive to velocity levels.

In the third part, additive synthesis, or FM synthesis FM synthesis, will be explored.
In contrast to the typical analog subtractive synthesis, FM synthesis creates complex waveforms from simple waveforms (sinusoids). These simple waveforms are often referred to as operators, or carriers and modulators. As an example, the classic Yamaha DX7 had 6 digital sine wave operators per voice and 32 patching algorithms where these operators were combined to create complex waveforms. Creating FM synthesis in SuperCollider is rather easy, and in this part of the workshop we will explore this in a similar way to the Yamaha chips in the OPL family.
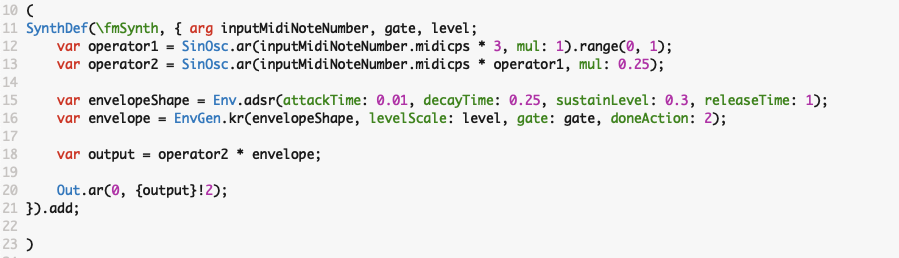
In the synth definition, each operator is represented by a sine wave oscillator, SinOsc running at audio rate. For a simple test of the FM synthesis, create two operators, setting the range of the first oscillator to be between 0 and 1, and then multiplying the first operator with the frequency of the second. This is similar to adding a vibrator to the second oscillator, but the modulation frequency is now in the audible frequencies instead of a slow vibrato.
In the following example the frequency of the modulator, the partial tone, and the amplitude of the modulator, i.e. the modulation depth, are varied by two MIDI CC messages. In my example code, I use control message 77 and message 93, but any control message can be used.
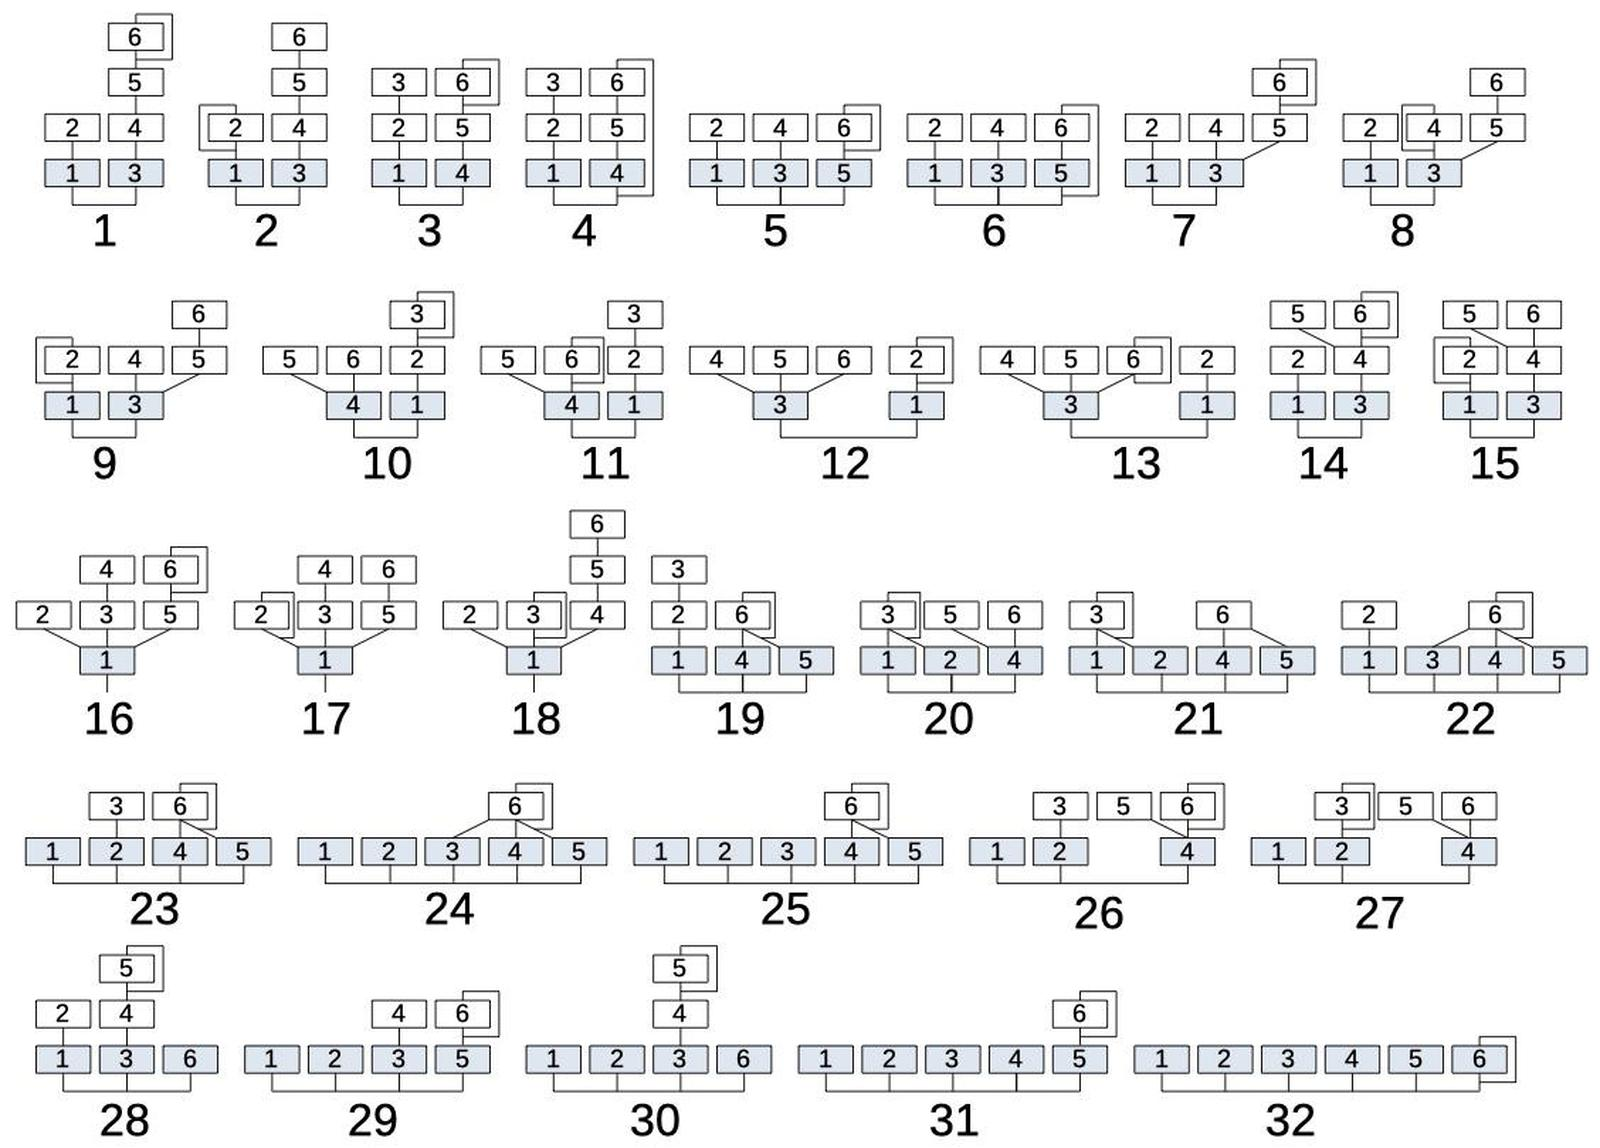
It is more interesting with more operators than two, and exploring different algorithms for connecting these operators together. In the following two examples operator 1 modulates both operator 2 and operator 3, and operator 3 modulates operator 4. The output of operator 2 and operator 4 is then mixed together. Control message 77 changes the partial, which in turn changes the frequency of operator 1 and operator 3. Control message 93 chnges the modulation depth of operator 1 and operator 3.
In the fourth example two LFOs (low frequency oscillators) and a resonance lowpass filter (RLPF.ar) are added. One LFO is a sine wave oscillator controlling the cut-off frequency of the lowpass filter (SinOsc.kr(0.1).range(250, 2000);) between 250 and 2000 Hz. The other LFO, also a sine wave, acts as an tremolo and controls the amplitude of the output between 0.1 (almost fully attenauted sound) to 1 (no attenuation).
Also in this part any MIDI message can be used. The value of these can either be mapped on the client side or in the synth definition. There is more or less no end on the possibilities for writing the synth definition, or by writing client scripts and sending information to the synth, or connecting control messages to different parameters in the synth, but that is something that can be further explored during the workshop!
In the fourth part, sample playback, or sample synthesis will be explored.
In contrast to the previous presented synthesis methods, sample playback uses a pre-recorded sound and plays this sounds in different speeds (or rates) and by this changes the frequency of the sound. I have recorded four sounds that can be used for this part of the workshop, but other sounds can easily be downloaded from the internet or recorded using your mobile phone.
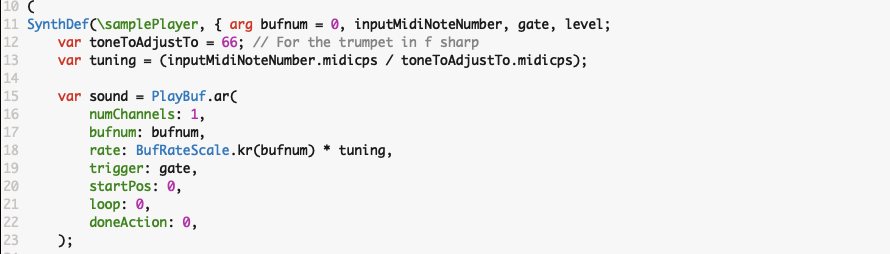
In the following example, on the client side, a sound file needs to be read into a buffer. This is done by using Buffer.read( followed by the server name, most often s, followed by the path to the audio file. The buffer should be stored in a variable and then sent to the synth definition on the server. In the synth definition the buffer is received and often stored in a variable called bufnum, and then each sample in the buffer will be played back at a specific speed (rate).
In the synth definition PlayBuf in audio rate (.ar) is used to play the sound sample. This function as a number of input arguments: the number of channels (numChannels), the buffer input (bufnum), the rate (i.e. the sample rate to play the sound file in), trigger (for keypresses), start position of the sound sample (startPos), loop for looping the sound sample, and a done action.
The playback speed of the sound sample determines the pitch of the sample, and by using BufRateScale.kr(bufnum) the rate will be correct to the sample frequency of the recorded sound sample (where bufnum is the sound buffer received from the client side). To make a musical instrument of a sound sample the rate should be adjusted to the key pressed on the keyboard, and tuned to the recorded sample. First, determine the correct pitch of the sound sample, and translate that to the corresponding MIDI note number. By creating a variable (tuning in my example) where the incoming MIDI note number converted to frequency is devided by the pitch of the sample converted to frequency, this factor is then used to multiply the BufRateScale.kr value. This will make the rate of PlayBuf to vary in relation to the MIDI key and the sample will be played back in the correct speed for the right frequency.

The sound sample can then be manipulated in similar ways as previous described synthesis methods. In this example to shelving filters are used, one for low frequencies and one for high frequences. Shelving filters are typically found in EQs, and a low shelving filter (BLowShelf) either attenuates or amplifies frequencies below the cutoff frequency, and a high shelving filter (BHiShelf) attenuates or amplifies frequencies above the cutoff frequency.
On the client side MIDI controller 73 is adjusting the low Shelving filter and controller 75 is adjusting the high filter. Both these controllers goes from -48dB attenuation to 18dB amplification of the sounds.
The other sound samples can be used as well, and in the following example the synth sound is used. The code is also updated with pitch bend and vibrato using the MIDI message bend and MIDI controller 1, in the same way as for the previous examples.
The paper noise might not be as melodic, but adds some interesting soundscapes in the really low frequencies.
The following example combines the sample synthesis approach with subtractive synthesis by adding a sine wave oscillator one octave (8 tones or 12 half-tones) below the sound sample.
There is a better sample player than PlayBuf if additional SuperCollider plugins installd: http://supercollider.github.io/sc3-plugins/. The plugin LoopBuf.ar allows the selection of a start postion and a loop section, which the normal PlayBuf.ar does not. The startPos can then be specified for the correct start of the sound sample, and the loop positions can be specified for looping the sound sample when the key is kept pressed. Additionally pitch bend and vibrato from the modulation wheel can be used to further alter the rate variable.
Also in this part any MIDI message can be used. Data can be connected to these messeages and the sound can be changed by these data values. A lowpass filter (LPF) can be used to change the sound of the sample, or a sinus oscillator can be used for FM synthesis of the sound sample.